Let’s hope you only run into the easy fix variety, but we’ll prepare you for the less easy, guaranteed to work fixes too.
Why Is Filename Length Even An Issue In Windows?
There’s a long history of filename lengths being a problem for operating systems like Windows. There was a time when you couldn’t have filenames longer than 8 characters plus a 3-character file extension. The best you could do was something like myresume.doc. This was a restriction in place by the design of the file system. Things got better as new versions of Windows came out. We went from an old, limited, file system to something called the New Technology File System (NTFS). NTFS took us to a point where a filename could be 255 characters long, and the file path length could potentially go up to 32,767 characters. So how can we possibly have filenames that are too long? Windows has things known as system variables. These are variables that Windows relies upon to function, because Windows will always know what the variables mean and where they are, even when we’re moving bits and bytes all over the place. The system variable MAX_PATH is the one that restricts filenames and file paths to under 260 characters. Being a variable, you’d think we could change it. No, we should not. It would be like pulling a thread out of a sweater. As soon as one system variable changes, other system variables and components dependent on them start to unravel. How do we fix it, then?
The Easy Fix
If you’re fortunate, you’ll get the error and know exactly what file’s name is causing the issue. Or at least where to find the file. Maybe you have a filename that looks something like: It’s obvious who the offender is in this case. Find the file in Windows Explorer, or File Explorer as it’s called in Windows 10, click once on it, hit F2 to rename it, and change that silly filename to something more reasonable. Problem solved.
The Less Easy Fixes
It isn’t always that easy to fix this problem. Sometimes you may not be able to change the names of files or directories for whatever reason. The following solutions will do the trick for you. They aren’t hard to do.
Move, Delete, Or Copy Files Or Directories Using PowerShell
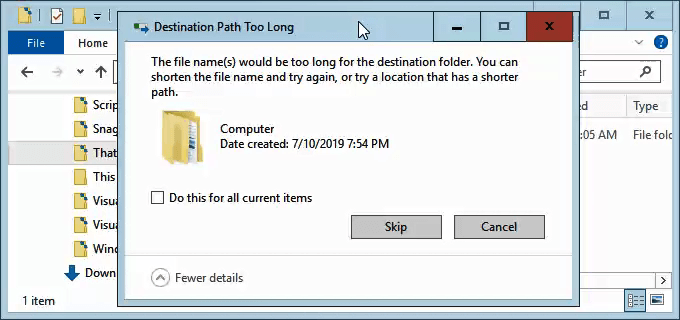
Sometimes you get an error when trying to move, delete, or copy directories where the character count for the file path is more than 260. Note that the words directory and folder are interchangeable. We’ll use ‘directory’ going forward. The following PowerShell cmdlets can also be used on files. Perhaps the file path looks something like: That file path is 280 characters long. So we cannot copy the directory out of there to somewhere else with the normal copy-paste method. We get the Destination Path Too Long error. Let’s assume that for whatever reason, we can’t rename the directories in which the file is nested. What do we do? Open PowerShell. If you haven’t used PowerShell yet, enjoy our article Using PowerShell for Home Users – A Beginner’s Guide. You can do the next steps without reading the article, though. When PowerShell opens, you’ll be at the root of your user directory. Follow along assuming C:\Users\guymc is your user directory. The directory named This is inside the Documents directory. To move into the Documents directory, we use the DOS command cd Documents. You’ll see the prompt change to C:\Users\guymc\Documents. That’s good. We’re working closer to the directories which will make things easier.
Copy Directory Using Copy-Item
We want to copy the directory This and its contents into ThatNewFolder. Let’s use the PowerShell cmdlet Copy-Item with the parameters -Destination and -Recurse. -Destination tells PowerShell where we want the copy to be. -Recurse tells PowerShell to copy all the items inside to the destination. Copying leaves the originals where they are and makes all new ones in the destination.
Move Directory Using Move-Item
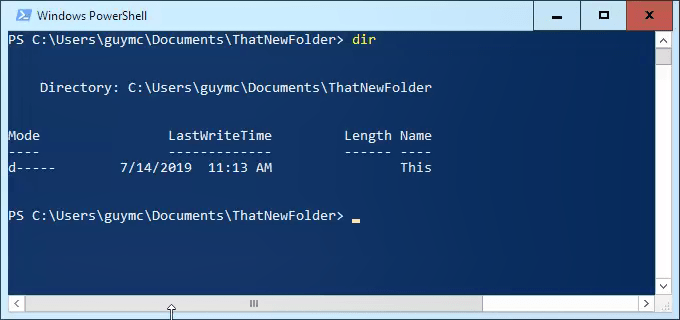
Let’s say we want to move the directory This, and all the directories and files in it, to ThatNewFolder. Moving does not leave the original in place. We can use the PowerShell cmdlet Move-Item with the parameters -Path and -Destination. -Path defines the item we want to move and -Destination tells PowerShell where we want it. The cmdlet will put This inside of ThatNewFolder. It will also move everything that is inside of the This directory. Move-Item can be used to move files or directories, and it works regardless of file path or filename length. To make sure it worked, use the cd ThatNewFolder command to get into ThatNewFolder. Then use the dir command to list the directories in ThatNewFolder. You’ll see the This directory is in there.
Delete Directory Using Remove-Item
If we want to delete the This directory, and everything in it, we use the Remove-Item cmdlet. The Remove-Item cmdlet has some built-in safety that makes it difficult to delete a directory with things inside of it. In our example, we know we want to delete everything, so we’ll use the parameters -Recurse to make it delete everything inside and -Force to make it do that without asking us if we’re sure for every item inside. Be warned! Recovering anything deleted this way would be extremely difficult. You can try the methods in How to Recover Accidentally Deleted Files, but don’t expect much. You can use the dir command again to make sure it is gone.
Make Windows 10 Accept Long File Paths
If you know you’re going to be using long file paths and long file names repeatedly, it’s easier to make Windows work for you. No sense using PowerShell to do the work every day. There are two ways we can do this. One is for Windows 10 Home users and the other is for Windows 10 Pro or Enterprise users. These methods may work for Windows 8.1 or earlier, but we cannot guarantee that.
Make Windows 10 Home Accept Long File Paths
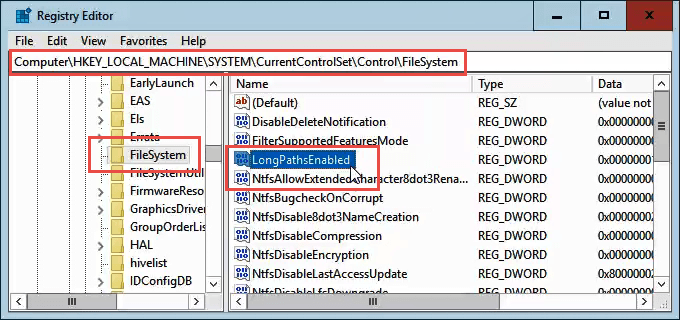
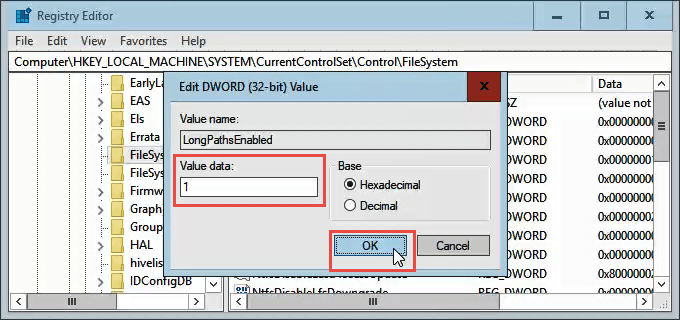
To make Windows 10 Home accept long file paths, we need to open the Registry Editor. If you haven’t worked in Registry Editor before, be cautious. Accidentally deleting or changing things in here can stop Windows from working completely. Always make a backup of your registry before making any changes. Learn everything you need to know about that in our Ultimate Guide to Backing Up and Restoring the Windows Registry. Once you have Registry Editor opened, and your backup made, navigate to the location HKEY_LOCAL_MACHINE\SYSTEM\CurrentControlSet\Control\FileSystem and find the key LongPathsEnabled. Double-click on LongPathsEnabled. In the Value data: field, make sure the number 1 is in there. Click OK to commit the change. Exit Registry Editor and you should be able to work with crazy long file paths now.
Make Windows 10 Pro Or Enterprise Accept Long File Paths
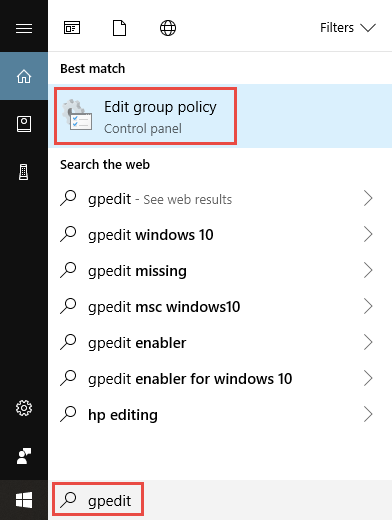
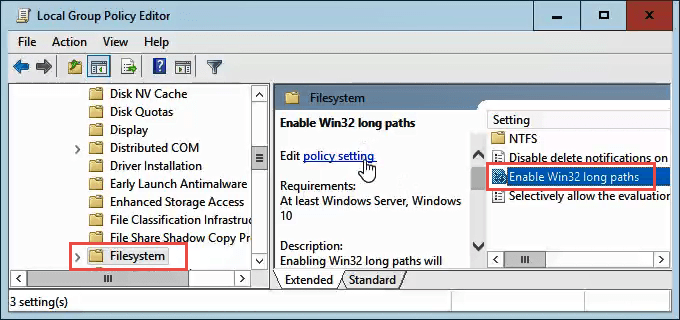
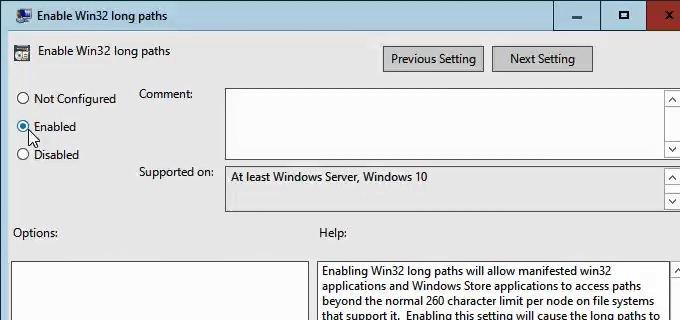
To allow Windows 10 Pro or Enterprise to use long file paths, we’re going to use the Group Policy Editor. It’s a tool that allows us to set policies on how Windows operates at the computer and the user levels. We’ve got several articles on using group policy to do things like disabling or enabling Internet Explorer options, or adding a message to the logon screen. Open the Group Policy Editor by going to the Start menu and typing in gpedit. The top result should be Edit group policy. Double-click on that. Once the Group Policy Editor opens, navigate to Computer Configuration > Administrative Templates > System > Filesystem. There you’ll see the policy Enable Win32 long paths. Double-click on it to edit the policy setting. Change it from Disabled to Enabled, then click the OK button to commit the change. The policy may not take effect right away. You can force the group policy to update, though.
That’s It
There are some other ways to work around long filenames and file paths, but what we’ve gone through here are the simplest, most effective methods.


